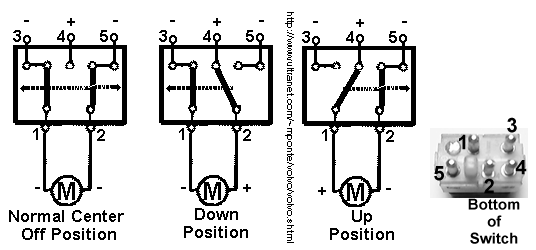
This is the schematic diagram of the window switch. I am showing
all three positions. In the normal position, contacts 1-3 and
2-5 are made. When the switch is pushed into the down position
1-3 remain closed but 2 moves to 4. In the up position 2-5 remain
closed but now 1 moves to 4. 
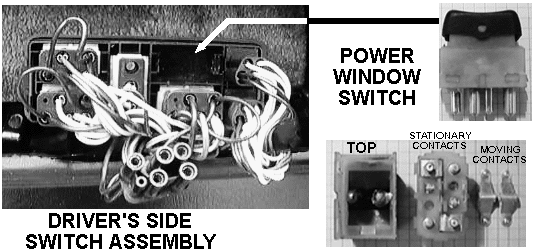 This shows the switch assembly
from the drivers side. The upper right photo is the switch removed
from the assembly. In the lower right I have taken the switch
apart for cleaning.
This shows the switch assembly
from the drivers side. The upper right photo is the switch removed
from the assembly. In the lower right I have taken the switch
apart for cleaning. 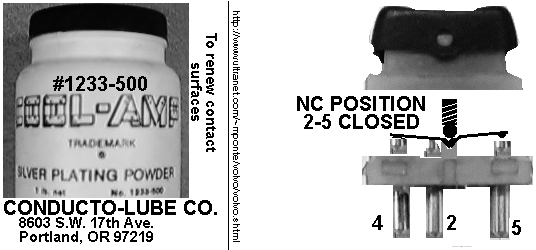 After burnishing the contacts it
is helpful to re-silver them. The motor draws a few amps and a
clean, silver surface will make the switch trouble free for a
while. The photo on the left shows a jar of silver powder and
the address of the company that sells the product. I have no affiliation
with them. The photo on the right shows how the switch works in
the relaxed position. There are two contacts that are closed on
each side of the switch. Terminals 1 and 2 are always touching
the moving contact.
After burnishing the contacts it
is helpful to re-silver them. The motor draws a few amps and a
clean, silver surface will make the switch trouble free for a
while. The photo on the left shows a jar of silver powder and
the address of the company that sells the product. I have no affiliation
with them. The photo on the right shows how the switch works in
the relaxed position. There are two contacts that are closed on
each side of the switch. Terminals 1 and 2 are always touching
the moving contact.

Updated on August 2, 2016
Pin numbering
Thanks to david@maccall.net